Challenge Summary
Welcome to the “UI Script Editor Interaction Design Challenge”. The goal is to design an editor interface that will build Workflow flow diagrams in a graphical environment. The editor will provide an intuitive drag-and-drop interface to help quickly design the automated workflows, which will create the robot script to be built and run.
Read the challenge specification carefully and watch the forums for any questions or feedback concerning this challenge. Let us know if you have any questions in the challenge forum!
01) Framework Library Panel in the UI Script Editor
02) New UI Script Editor Drag & Drop Interaction
03) Table View of New UI Script Editor
01) Framework Library Panel in the UI Script Editor
02) New UI Script Editor Drag & Drop Interaction
03) Table View of New UI Script Editor
04) Load Script
Creativity: 6
Read the challenge specification carefully and watch the forums for any questions or feedback concerning this challenge. Let us know if you have any questions in the challenge forum!
Round 1
Submit your initial designs for checkpoint feedback01) Framework Library Panel in the UI Script Editor
02) New UI Script Editor Drag & Drop Interaction
03) Table View of New UI Script Editor
- As part of your checkpoint submission, you must upload your submission to MarvelApp so we can provide direct feedback on your designs. Please include the MarvelApp URL in your notes.txt
- Make sure all pages have the correct flow. Use the proper file numbers, (1, 2, 3, etc.)
Round 2
Submit your final designs with all checkpoint feedback implemented01) Framework Library Panel in the UI Script Editor
02) New UI Script Editor Drag & Drop Interaction
03) Table View of New UI Script Editor
04) Load Script
- As part of your Final submission, you must replace your checkpoint submission with the final submission into MarvelApp so we can provide direct feedback on your designs. Please include the MarvelApp URL in your notes.txt
- Make sure all pages have the correct flow. Use the proper file numbers, (1, 2, 3, etc.)
- If you're not submitting in the Checkpoint/Round 1, you are not eligible to submit in the Final/Round 2
CHALLENGE OBJECTIVES
- UI Design for an online script editor
- Four (4) distinct features
- Making the UI for Workflow Designer more refined from script based to drag-and-drop.
- Visually present refined experience by showing the step-by-step workflow interaction.
BACKGROUND OVERVIEW
- Our client is an in-house Process Automation solution for automating repetitive tasks by mimicking user behavior performed on Desktop and Web Applications in both Cloud and On-premise environments. The solution is built on Robot Script framework and all workflows are defined as scripts for bots to perform surface and object based automation accordingly.
- Currently all workflows are defined in the form of scripts. Robot framework scripting skills are necessary for creating new use cases. This script is then uploaded to the processes tab of the dashboard.
TARGET AUDIENCE
- Technical user who designs automation workflows.
PERSONA
- Name: Gillian Parker
- Occupation: Workflow Builder
- Goal: Easily create workflows using drag-and-drop interface.
- Frustrations: Manually adding the framework library and typing the names to create the workflow is cumbersome. Memorizing all the library's names is difficult.
- Wants: A graphical and intuitive way to create the workflow using drag-and-drop. The ability to select from a pre-populated list or autocomplete feature will make her task easier.
CURRENT USER STORY (for comparison)
See this documentation folder for screenshot of current flow.
- Gillian opens the UI ScriptEditor.
- She then clicks “Edit Import” button and is required to type the library name she want to add from this list eg. “RPA.Desktop.Windows”, then she clicks the “Save changes” button.
- In the Process Script area, the library appears as a red box.
- Next step is to add a keyword/task to the library. The library can contain as many keywords/tasks as needed.
- She then clicks on the “Create Step” to add a task into the workflow. Gillian need to manually specify the keyword name, eg. : “Create Webdriver”
- When she clicks “Save changes” in the Process Script area, the keyword will be added as green box.
- She then clicks on the “Create Step” to add a keyword into the workflow. She can convert a keyword into a task by clicking the checkbox. Gillian needs to type in the keyword, eg. : “Wait until Element Is Visible”.
- She can also add as many argument lines as needed. eg. she can add argument line “//*[id=logo_no_globe_new_logo.” and then add another argument line “10”.
- When she clicks “Save changes”, in the Process Script area the task and keywords will be added as grey box.
- When she is done designing the workflow, she then clicks the “Preview Script” button to generate the robot script corresponding to what she designed.
NEW USER STORY TO DESIGN - FEWER CLICKS
- Gillian opens the UI ScriptEditor.
- Instead of typing the library name, Gillian has a better option. She sees the Framework panel with all of the 32 framework libraries listed with icons.
- The libraries are shown as a tree structure. When she clicks on any of the Library modules, it would display the keywords associated with it.
- She can drag-and-drop the library module to start designing workflow,
- For example. Select “RPA.Desktop.Windows” from the library panel, drag-and-drop it to the Process Script area.
- In the Process Script area, the library is displayed (currently seen as the red box).
- On click of the library, Gillian will see the keywords associated with it and she can select the ones she wants to add
- To add a task, Gillian will right-click on the keyword (currently seen as a green box), then see a pop-up which contains Add Task, Add Keyword.
- Once Gillian selects “Add Keyword,” she will be given a list of available keywords that she can use. For example, “Wait until Element Is Visible”.
- Once she selects the keyword she needs to specify the arguments of the keywords. For example, “//*[id=logo_no_globe_new_logo.” and then adds another argument line “10”.
- Once Gillian select “Add Task,” she will be presented a popup where the name of the task can be specified.
- When she is done designing the workflow, she then clicks the “Preview Script” button to generate the robot script corresponding to what she designed.
DESIGN CONSIDERATIONS
- The design should be simple, intuitive, and easy to use
- Use color or visual cues to help users through the workflow. Feel free to suggest colors that are suitable for these functionalities outside of the current green, red and gray.
- Clearly show drag-and-drop interaction, pop-up
- Reduce the number of interactions required from users as much as possible.
EXPLORATION SCORE
In terms of expectations, we would like to measure the concept against the following in the one to ten scales:
Creativity: 6
- 1: barely new ideas
- 10: a utopic product with features not proven to be able to be fully implemented
Aesthetics: 6
- 1: low-fidelity design, wireframe or plain sketch
- 10: top-notch finished looking visual design
Exploration: 7
- 1: strictly follow an existing reference or production guideline
- 10: open to alternative workflows/features not listed here that would help the overall application
Branding: 4
- 1: don’t care at all about the branding just functionality
- 10: without a properly branded product there is no success
GLOSSARY
- RPA = (Robotic Process Automation) The use of software bots to automate highly repetitive, routine tasks normally performed by knowledge workers
- Framework library = 32 sets of open source libraries. In this design, we will creating a new visual library which contains 32 of icons and the framework name. For example: archive, browser.selenium, browser.playwright, cloud.aws, cloud.azure, cloud.google, database, etc. Full list can be found here.
- Library = Libraries provide the actual automation and testing capabilities to Robot Framework by providing keywords. Users can drag-and-drop from the element library. (currently shown as a red box)
- Keyword, Keywords are the foundation upon which all robot tests are built. Keyword can be treated as a single test step. Just as a test is conceptually made up of many steps, a robot test is made up of many keywords. In script this will be indented, (currently shown as a green box)
- Task = Tasks is a library for controlling task execution during a Robot Framework run. It allows conditional branching between tasks, loops and jumps, and optionally validating the execution through a schema file. It can also be used to visualize the tasks as a graph. (currently shown as a grey box)
- Argument = a parameter which is associated to each keyword/task.
SCREEN REQUIREMENTS
01) Framework Library Panel in the UI Script Editor
- This UI Script Editor will need a framework library panel.
- This library panel will list all 32 framework libraries' names with respective icons. List all the library names found here. For example: archive, browser.selenium, browser.playwright, cloud.aws, cloud.azure, cloud.google, database, etc.
- Right now the list is limited to 32 sets; this number can expand in future. Your design must accommodate a larger number.
- This panel can be in the form of a tree structure or similar. On click of any library module, the user should see the list of keywords associated with it. The keyword list is found here.
02) New UI Script Editor Drag & Drop Interaction
- Show screen where users can drag-and-drop the library module to start designing.
- For example: drag-and-drop “RPA.Desktop.Windows” from the framework library panel, to the Process Script area.
- In the Process Script area, show the library module (red box) with the name RPA.Desktop.Windows.
- Show interaction when adding keyword (green box):
- On click of the library module, display the list of keywords associated with that module. The user should be able to select the keywords needed. See the complete keyword list for RPA.Desktop.Windows here. For example: User selects the keyword “Wait until Element Is Visible”.
- Show the pop up interaction when the user right clicks the keyword (green box). The pop up will contain action: Add task
- Show interaction when adding task (grey box):
- To add a task, user right-click on the keyword (green box), then see a pop-up which contains “Add task”, “Add keyword”. User will click on the “Add task”.
- User then needs to specify the arguments of the keywords. Eg. “//*[id=logo_no_globe_new_logo.”
- User can add another argument line “10”.
- Show screen when user clicks “Preview Script” button to generate the robot script corresponding to what she designed.
03) Table View of New UI Script Editor
Refer to alternative view - table mode.png.
- Explore another way of displaying the workflow.
- In the Process Script area, instead of only showing the graphical flow, the user can switch to table view mode.
- In this mode, the user will be able to see the detail in tabular format. The only requirement is: Improve the look of this UI.
04) Load Script
This is a NEW feature.
- Add a button “Load Script”
- On click of load script, the user can select the script from his computer and then load it to the web-app.
- Show a loading state screen.
- After completely loading the script, the Process Script area will show the preview of the workflow. This will be similar to the preview of a workflow they build in the editor.
DOCUMENTATION
- https://rpaframework.org/,
- https://robotframework.org/#documentation
- Documentation folders. This is an old screenshot from the current editor. We need your help to make it more intuitive.
REFERENCES
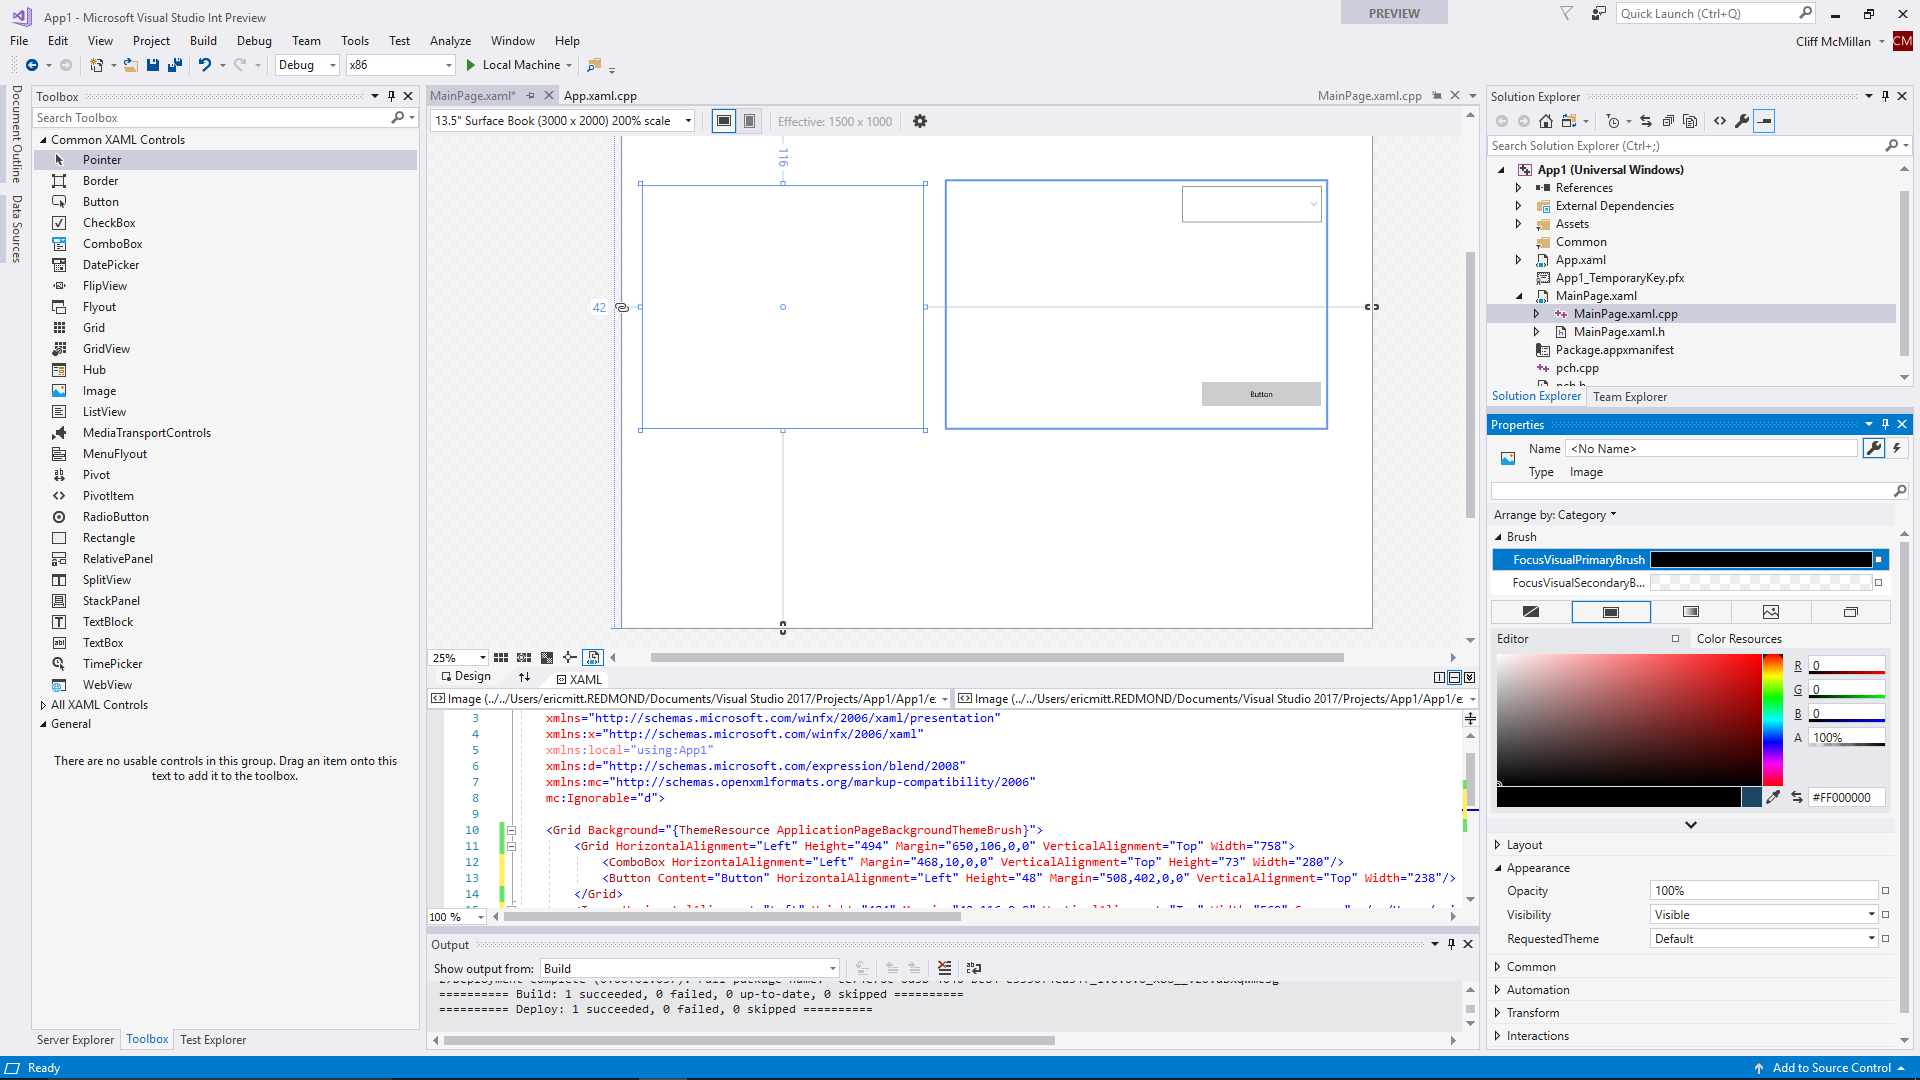
- Microsoft Visual Studio (check toolbox screenshot): we want this kind of library where users can drag-and-drop elements then select properties from list or type keyword. Please use this only for your reference
BRANDING GUIDELINES
- Font: Arial
- Colors: right now this is the current color scheme that client is using. Feel free to propose another color scheme you think best for this interface.
- CTA Cyan #16B8EB,
- Background white #FFFFFF
- Grey line separator #EFEFEF
- Grey icon #939393
- Black text #433B3F
- Red box #FF3707
- Green box: 90E1A3
- Grey box: D8D8D8
- Icon: feel free to create from scratch or use any free for commercial use stock icons in your design.
TARGET DEVICES
- Desktop: 1440px width with height adjusting accordingly
MARVEL PROTOTYPE
- We need you to upload your screens to Marvel App
- Please request for marvel app in the challenge forum
- You MUST include your Marvel app URL (in your marvel app prototype, click on share and then copy the link & share it with your notes/comment on this link while you upload)
SUBMISSION AND SOURCE FILES
Submission File
- Submit JPG/PNG image files based on Challenge submission requirements stated above
- MarvelApp link for review and to provide feedback
- Declaration files document contains the following information:
Source Files
- All source files of all graphics created in either Sketch, Adobe XD, Figma, or Photoshop and saved as an editable layer
FINAL FIXES
- As part of the final fixes phase, you may be asked to modify your graphics (sizes or colors) or modify overall colors
Please read the challenge specification carefully and watch the forums for any questions or feedback concerning this challenge. It is important that you monitor any updates provided by the client or Studio Admins in the forums. Please post any questions you might have for the client in the forums.