
|

By Ghostar
TopCoder Member
The goal of this article is to provide a good understanding of what use case and sequence diagrams are, how they are properly created, and how they can influence a design. This article will cover the standard parts of each diagram and how they fit together, at the proper level, to create a diagram that will help developers and users.
Throughout this tutorial we will focus on the File Validator component, using that component to show the right and wrong ways to create the use case and sequence diagrams.
Use Case Diagrams
A use case diagram is a simple diagram that describes what can be done with the component. It should describe, in simple terms, all major functionality that can be accomplished with a component
Use Case Items
A use case is made up of the following items:
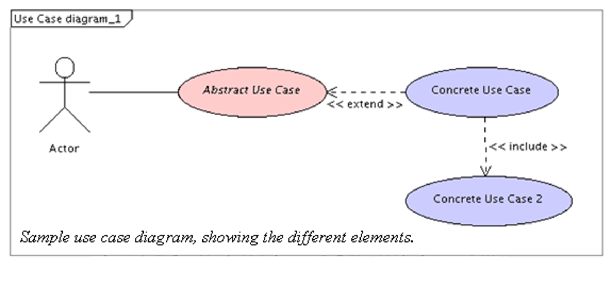
- Actors: Actors describe the item that uses the functionality of the component. Normally, for TopCoder components, the main actor is just an "Application", as the components are normally libraries that use the component we are designing. Sometimes though, there could be other actors, possibly the "User." The "User" is often seen as an actor in web components that the user directly interacts with, like the Calendar Tag component.
- Use Cases: A use case describes the actual functionality that can be performed with the component, like "Validate file," or "Format code," or "Convert a value from one unit to another." There are two main types of use cases, concrete and abstract use cases.
- Concrete Use Case: A concrete use case defines functionality that the actor can use directly. Normally, concrete use cases directly map to a part of the API in the component that the user can call to perform some operation. A concrete use case is used directly by the actor to perform some sort of operation.
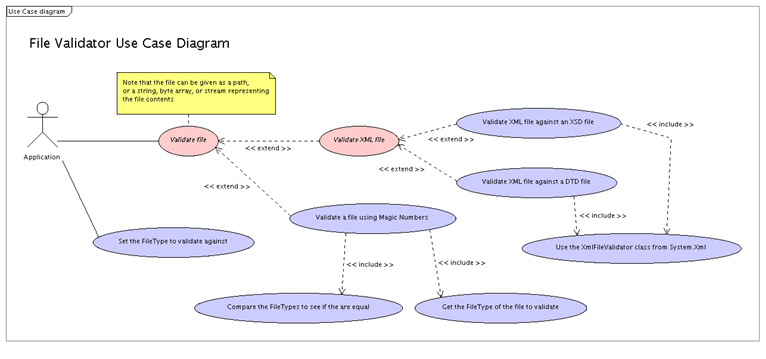
- Abstract Use Case: An abstract (or sometimes called aggregate) use case doesn't describe functionality that can get called by the user. Instead, it defines common functionality that is shared between multiple use cases. For instance, if we have two use cases that have similar functionality, but different implementations, they can be grouped with an abstract use case. In the File Validator component, we have two different XML validation schemes, DTD and XSD validation. Both of these validation types perform the same type of operation, but their implementations are different. In this case a "Validate XML file" abstract use case should be used to group the two separate, concrete use cases.
- Relationships: There are two main relationships that are normally used - include and extend. There is a third available (a generalization relationship) that is very similar to an extend relationship, with some minor differences. The generalization relationship isn't used very often, and is not covered in the sample Use Case diagrams given by TopCoder for designers.
- Include Relationships: The include relationship defines a relationship between two use cases where one use case uses the functionality in another use case as part of its processing. The include relationship is shown by a dashed arrow from one use case to the other use case the first will use. It should be marked with an "<<include>>" stereotype.
- Extend Relationships: The extend relationship shows a relationship from a concrete use case, normally to an abstract use case that is used to show that the concrete use case provides the functionality of the abstract use case in an implementation specific way. Generally speaking, the extend relationship shows that the use case at the origin of the extend arrow decorates the extending use case somehow, with some sort of specific implementation. In the File Validator component, the abstract use case is "Validate XML File". An extend relationship is shown from "Validate XML file against an XSD file" to show that the XSD use case extends the "Validate XML File" use case by providing XML file validation using an XSD schema. The extend relationship is visually similar to the include relationship, but instead of being marked with an "<<include>>" stereotype, it is marked with an "<<extend>>" stereotype.
- Generalization Relationships: While the extend relationship defines that one use case extends another with implementation-specific or additional functionality, a generalization relationship defines a relationship where the child can replace the parent without affecting the overall process to the user. For instance, if we had a "Validate XML file against an XSD file" concrete use case, it would be possible to have a "Validate XML file against an XSD file using X" use case generalize the original, as the new use case could completely replace the original concrete use case to the user.
Determining The Proper Use Cases
Determining the proper use cases is probably the hardest part of generating the use case diagram. There are a lot of mistakes that can be made when figuring out what use cases to include.
The main step in getting the use cases right is to do the Use Case diagram before you do anything else in the design. This ensures that the use case isn't affected by the designer's vision of the implementation, which can lead to errors.
In a TopCoder design competition, the easiest way to determine the use cases to include is to first go through the requirements, pulling out required operations that the user should be able to accomplish with the component. If it is a functionality requirement, it should be a use case and also easily accessible in the API.
For the File Validator component, the following required operations can be taken from the requirements specification given:
- Validate string
- Validate stream
- Validate byte array
- Validate file path
- Validate an XML file using an XSD schema
- Validate a file using its file type and the Magic Numbers component
The first four use cases pulled from the requirements — Validate string, Validate stream, Validate byte array, and Validate file path — can be all grouped under a "Validate file" use case. There was the option of making each concrete type that the component could validate (string, stream, byte array, file path) its own concrete use case, but I determined that doing that would lead to use cases that were too "low level" (see below for more on identifying proper level). Although it was decided not to include those use cases, a note was added explaining that the use case covered those possibilities, as it is a requirement of the design that the use cases cover the requirements mentioned in the requirement specification.
The first thing to do when defining the use case diagram is to determine the actor. In this case, we know the component is a library that can be used by TopCoder for many different projects, but will always be part of a much larger program. Since this component isn't used directly by a user, only as a library, we can determine that the actor should be called "Application," representing the larger application that will use this component.
Next, we look for any abstract use cases that may be defined. The abstract use case is easy to glean from the use cases pulled from the requirements. Notice that both the XSD and Magic Numbers validation both start with text similar to "Validate a file." This makes it obvious that they both describe the same sort of functionality that could be described by some abstract use case, which in this case we call "Validate file."
The next step is to add any concrete use cases. For this component, we add the "Validate a file using Magic Numbers," and "Validate an XML file using an XSD file."
Finally, we add the relationships. The first one is from the user to the abstract use case, and the next is the "extend" relationships from the two concrete use cases to the "Validate file" abstract use case.
After adding the note about the different input types allowed, we get a use case diagram that looks like this:
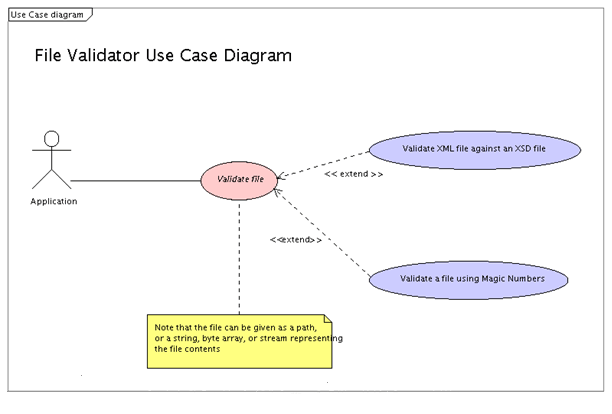
This diagram succinctly and accurately describes the functionality of the component at a high level. The user can see, just by looking at this diagram and nothing else in the component, what functionality is available.
If I had stopped here with the use case diagram, that would have been fine, and I would have had little to no trouble during review. My problem was that I decided to add some additional functionality, in the form of another XML validation scheme: DTD. This would allow me to get extra points for additional functionality, but these extra points were diminished because of how I chose to show that new functionality in the use case diagram:
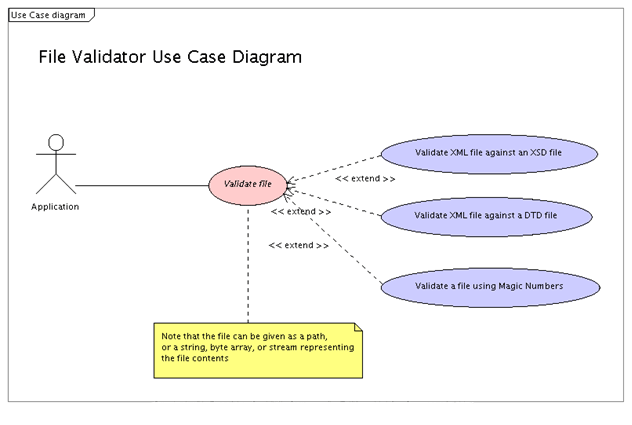
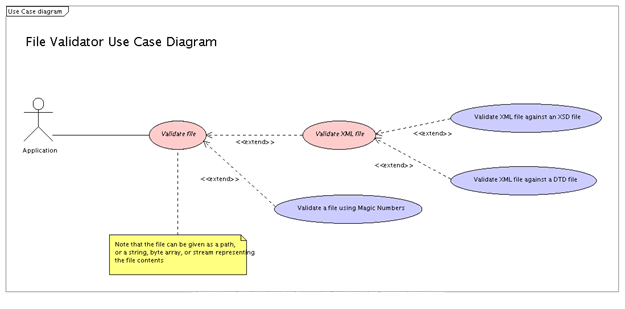
After final fixes, the final use case diagram looked like this:
Getting The Right "Level"
Determining if a use case has the right level - neither too high nor too low - is a tricky thing to do. First we have to know what is meant by use case "level." The level of a use case is really how well it defines what the functionality of the component is to the user. Determining if a use case is at the right level is really a matter of asking yourself two questions:
- Does the use case accurately explain to the user what functionality is available?
- Does the use case explain to the user how the functionality is obtained?
The purpose of the second question is to determine if the use case is too low level. The purpose of the use case diagram is to explain to the user what functionality is available in a given component, but the user doesn't need to know how the functionality is obtained.
For example, if the use case diagram I had come up with for the File Validator component had looked like this:
click for larger image
We could determine that a number of the new use cases were too low level, as they would fail the second question test. The user shouldn't care at this point that we use the XmlFileValidator, or that they need to set the FileType to validate against, or how the Magic Numbers component is used to validate the file type.
How The Use Case Diagram Affects The Design
The use case diagram should affect the overall design of the API, not the other way around. To ensure that the API is coherent and simple for the user, each concrete use case should be easily accessed through a method or two in the API. The easiest way to do this is to map each concrete use case to a method in the API, named similar to the use case if possible.
The areas in the use case diagram that are abstract should be represented by pluggable features in the design, either through an abstract class or an interface. Since the abstract use case defines similar behavior for use cases, and abstract classes and interfaces define similar behavior for classes, it should be straightforward to map the API and the use cases.
Going back to the File Validator component again, it is fairly obvious what the API should look like, just by looking at the use cases.
Since "Validate File" is abstract, it should be represented by an abstract class or an interface in the class diagram, if possible. In this component, the use case maps directly to the FileValidator class. The FileValidator class handles all the different file formats allowed — from string, to byte array, to path, and to stream, and the conversions between them — allowing the subclasses to only need to override a single method that takes a stream parameter. "Validate XML File" is also abstract, and it maps to the XmlFileValidator class. The XmlFileValidator class aggregates the actual validation functionality, so all the subclasses need to do is pass the parent class some parameters. The three concrete use cases can be seen mapping to the three concrete classes in the component. In this way, the component is coherent and should be easily used and understood by the user.
If you do the use cases first and allow the final use case diagram to affect the overall outcome of the API, you should end up with a component that will be coherent, consistent, and easy for the user to pick up and use.
Use Case Dos And Don'ts
- Do design the use case diagram first. Use the requirements to determine what use cases are needed. This will lead to an easy-to-read diagram, not affected by the designer's choices that come later on.
- Don't use class names in the use cases, especially class names from your own designed component. The use cases should be independent of the class diagram, and will likely be the first place a user heads to figure out what is possible with the component.
- Do use the proper abstract use cases and actors.
- Do make sure that the relationships used are the right ones and are pointing in the right directions.
- Don't change the use case diagram much, if at all, after it has been originally completed. While it may be hard to avoid, the chances for errors and "level" problems are much greater if the changes are done after the class diagram has already been started.
Sequence Diagrams
A sequence diagram is a diagram that shows the flow of data through an operation in the component. Normally a sequence diagram covers all the interactions that happen on a particular method call in the component.
Sequence diagrams are easier to produce correctly than a use case diagram. They are more time consuming, mainly because you generally need to do at least a couple for most components, but generating them is straightforward.
Sequence Diagram Items
Sequence diagrams are made up of two items, in a two dimensional grid. Along the X-axis are all the objects that are going to be used in the diagram. They should be named after the type they represent, like IDictionary or XmlFileValidator. Along the Y-axis run the messages between these items, representing all the different calls in the diagram.
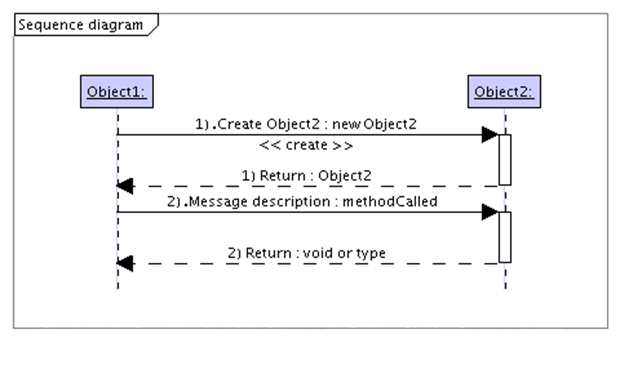
The messages run on "swimlanes" between two different objects. The actual call is represented by a solid arrow, and the return value is represented by a dashed arrow going back to the caller. Each message in the diagram needs to have a short description, as well as the name of the call being made. The return arrows just need to have "Return" as the description and the type returned as the message. The message returned should be "void" if the call doesn't have a return value. A create call is special and needs to be marked with the "<<create>>" stereotype.
Picking The Interactions To Show In Sequence Diagrams
Picking the correct interactions in the component to document as sequence diagrams is the most difficult part of the sequence diagram deliverable in TopCoder components. The TopCoder review guidelines for sequence diagrams states:
"Interactions involving five or more objects (both system and/or component) are considered complicated. Designers may include SDs with less than five objects, but they are not required to do so."
This helps a bit when determining what to diagram. Keep in mind that the number of objects is not just those in the component, but all those actually used in the operation, like all the SQL types (connection, command, reader), or all the XML types (XmlDocument, XmlReader, XmlNode, XmlElement).
Generally speaking, if an operation involves another TopCoder component — like ConnectionFactory or IDGenerator — it should be shown as a sequence diagram. The exception to this rule would be the Configuration Manager. Using the Configuration Manager just to read in simple properties for a class normally doesn't need to be documented in a sequence diagram. If, on the other hand, the Configuration Manager loading involves creation of more complex objects from the component, or moderate computation, it should be documented with a sequence diagram.
The biggest mistake I see when doing reviews is that designers don't include sequence diagrams they think are self-explanatory or easy. The normal operations skipped are SQL operations, like INSERT and UPDATE, as well as XML parsing operations. Keep in mind that the current scorecard doesn't allow a lot of leeway in this area, so it is a good idea to include SQL and XML interactions. This also helps clarify areas in the component, especially things like SQL connection handling.
Diagramming The Interactions
Actually generating the diagram isn't hard, but it can be time consuming. Optimally, the sequence diagram should show all interactions in a particular call, down to collection types like IDictionary and List. In practice, this can lead to large diagrams, but the more information available the better. Sequence diagrams are not approximations or overviews, they are meant to be an accurate representation of all the interactions in a call.
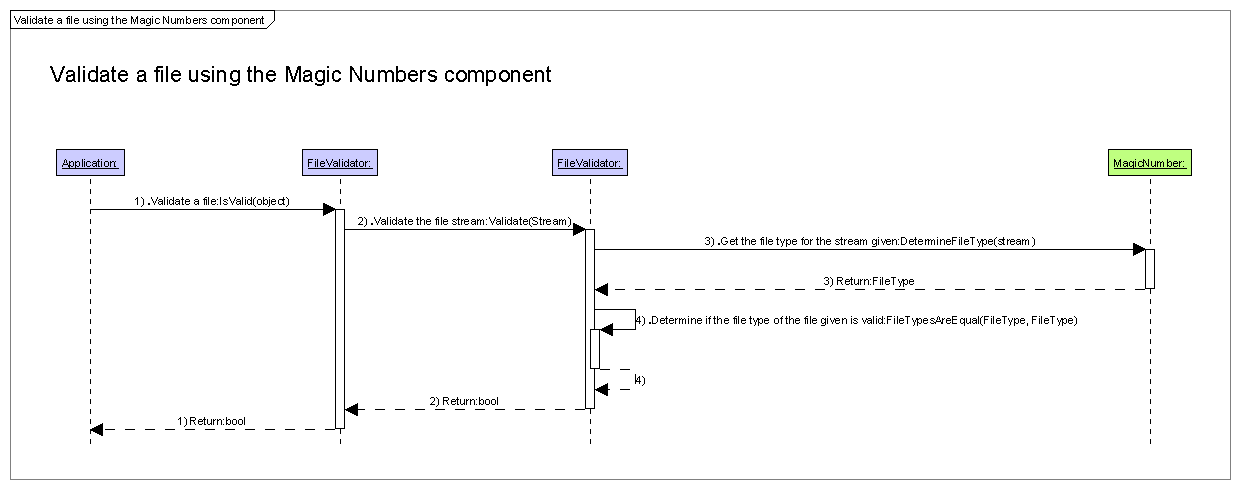
The sequence diagrams should normally start at the left side of the diagram with an "Application" object that represents the external caller. That object has a message from it to an object in the component, representing the call made.
click for larger image
This is the average case for sequence diagrams, but sometimes internal interactions that need to be documented could originate from an object inside the component. After the first interaction, it is just a matter of accurately showing the flow of data in the call, in as much detail as possible. Make sure to include objects not housed in your design, especially TopCoder objects from other components used.
Notice in the above diagram we show the FileValidator calling another instance of the FileValidator object. This is my way of showing internal interactions between the same instance of a class, but you can optionally use the loopback arrow, where the message loops back to the originating object.
Loops are extra pieces that can make a big difference in a diagram. Currently there are two ways of doing loops — you can use the loop construct in Poseidon 4.1.2, or you can do it the "old" way by drawing a rectangle around the area that is repeated. I prefer the "old" rectangle way, as you are allowed more documentation in the rectangle describing what the looping actually accomplishes. An example of looping can be seen in this diagram:
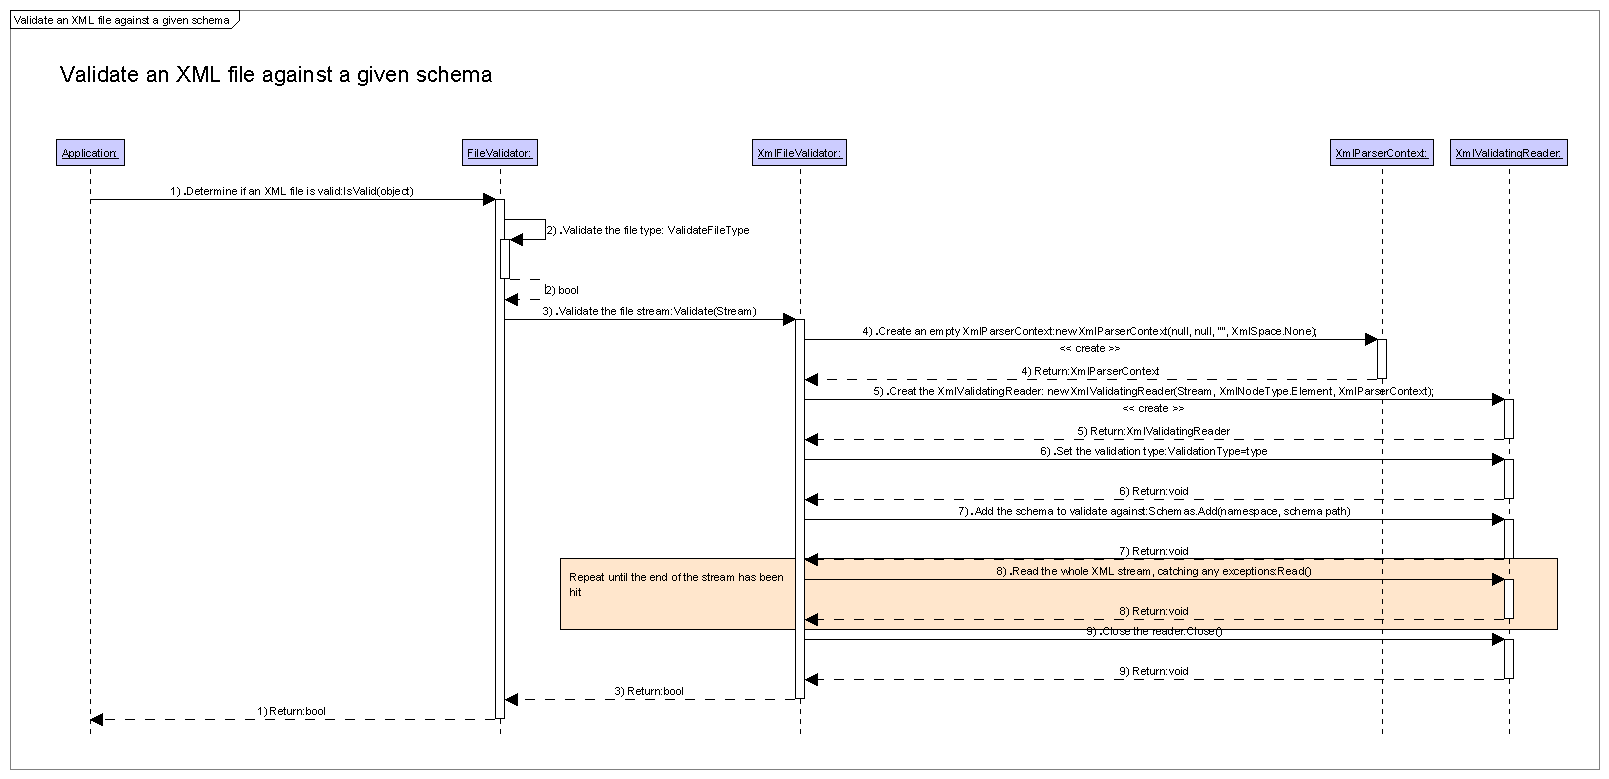
click for larger image
Possible Shortcuts
Here are two possible shortcuts you can take when doing sequence diagrams. These aren't officially sanctioned, so use at your own risk. I have found these to work well for me, in moderation.
Use notes to your advantage
A lot of times in components you will see that two or more interactions are similar, but still considered "complicated." In these cases you could save some time by doing one diagram well, then adding a note explaining the other interactions and how they differ from the main diagram. Only use this if the interactions are very similar, and the differences can be described in a sentence or two.
Show shortcuts to the interactions
Use this only in moderation, and only carefully. I have found that by using loops and other things you can show shortcuts to interactions. The main place I use this is XML parsing, where we read more than 3 items from an XML node. You can group these all into one call by adding a loop around the read and explaining in the loop that this interaction is repeated for "items 2-x," whatever they may be. Note that you still need to show all interactions; you are just grouping some together to save space.
Sequence Diagram Dos And Don'ts
- Don't show interactions that are simple and just set or get values of variables, like property setters and getters (that aren't calculated) and constructors that take the parameters and assign them to member variables. Such simple operations aren't required and detract from the sequence diagrams that are actually informative.
- Do make your sequence diagrams as detailed as possible. The more detail, the better, and you will never get docked points for having too much detail.
- Do show interactions outside the component. By confining your sequence diagrams to only objects in the current design, the diagrams tend to have missing information and aren't complete enough for development.
- Do the sequence diagrams after the class diagram has been finalized. By doing this, you ensure that the interactions and calls you show in the diagram exist in the component, and you lessen the likelihood of having to make changes to the sequence diagrams later on.
- Do use the sequence diagrams to evaluate the validity of your design. The more detailed you get with the sequence diagrams, the more the sequence diagrams will confirm or deny the assumptions you made in your design. If you start to have problems detailing the sequence diagrams, go back and take a second look at the design, and see if you can make changes to make things simpler.
One thing not really covered in this tutorial is proper coloring of the diagrams. You can review the sample use case and sequence diagrams for a good explanation of the colors used. The sequence diagram generation has changed with Poseidon 4.1.2, so you may need to be creative in getting them correct, at least until new samples are available for the updated versions.
Hopefully this tutorial gives you a good understanding about what use case and sequence diagrams are, and how they can be done correctly. Keep in mind these are just guidelines, not definitive rules - and always be prepared to appeal your decisions to reviewers.